We recommend the easy one-minute website creation with GitHub before considering following the steps on this page to download and edit your site locally 🧙♂️
OK, you got this far, so let’s go ahead and learn how to setup Hugo Extended to edit our site locally ✨
Prerequisites
Before downloading your site, lets first install Hugo Extended and its prerequisites.
For full functionality, Hugo requires the following prerequisites:
- Go
- Git
- NodeJS
Choose your operating system below to get started.
Windows
Open the Windows Powershell 5 app, installing it if necessary.
Install Scoop, the package manager for Windows, by pasting the following commands into Powershell and pressing the Enter ↵ key:
Set-ExecutionPolicy -ExecutionPolicy RemoteSigned -Scope CurrentUser
iwr -useb get.scoop.sh | iex
Press Y and enter if asked Do you want to change the execution policy?.
Install Hugo and its dependencies:
scoop install git go hugo-extended nodejs
Mac
Open the Terminal app.
Install Homebrew, the Mac package manager, by pasting the following command and pressing the Enter ↵ key:
/bin/bash -c "$(curl -fsSL https://raw.githubusercontent.com/Homebrew/install/master/install.sh)"
Apply any Homebrew updates:
brew update && brew upgrade
Install Hugo and its dependencies:
brew install git golang hugo node
Open the hidden ~/.zshrc (or ~/.bashrc) file in a text editor, add the following line, and restart your Terminal app so that Hugo can find the location of its Go dependency.
export PATH=$PATH:/usr/local/go/bin
Linux
For Ubuntu based distributions:
- Download the Hugo Extended installer for Debian (
hugo_extended_<VERSION>_Linux-64bit.deb) and double-click the downloaded file to install with Ubuntu Software Center.
For other Linux distributions:
- Download the Hugo Extended binary (
hugo_extended_<VERSION>_Linux-64bit.tar.gz) - Extract the download and move the
hugoapp to your website folder
Install Hugo’s Go dependency using Snap:
sudo snap install --classic go node
Troubleshooting
For issues installing or using Hugo Extended and its dependencies, ask the Hugo community.
Download a Template
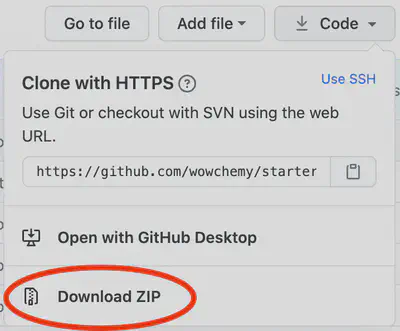
If you already created your site with Github:
- locate your Github repository, and either download the ZIP or use Git clone to download it
Otherwise, create a new site by downloading a Starter Template either directly, or using Git. Here are three examples:
- Download Hugo Academic Template
- Or with Git:
git clone https://github.com/wowchemy/starter-academic.git
- Or with Git:
- Download Hugo Blog Template
- Or with Git:
git clone https://github.com/wowchemy/starter-blog.git
- Or with Git:
- Download Hugo Book Template
- Or with Git:
git clone https://github.com/wowchemy/starter-book.git
- Or with Git:
If you downloaded a template, extract the ZIP file’s contents to a folder.
Then open your Terminal (Mac/Linux) or Powershell (Windows) app and use the cd command to navigate to your website folder.
- On Windows, for example:
cd ~\Downloads\starter-academic-master\starter-academic-master\ - On Mac or Linux, for example:
cd ~/Downloads/starter-academic-master/starter-academic-master/
View your site
View your site by running the following command:
hugo server
Hugo then provides you with a link (e.g. http://localhost:1313/) to open in your web browser.
For help troubleshooting common Hugo errors, check out the Troubleshooting guide.
在中国
If you are in China without VPN, Hugo can fail to download modules from GitHub.
To resolve this, you can try adding a proxy to the module section of your config/_defaults/config.yaml:
module:
  proxy: https://goproxy.cn
CMS
After running hugo server, access the local CMS in your browser at http://localhost:1313/admin/
You’ll be prompted to add the URL of your Netlify site. Once you’ve added that URL, you can login with a Netlify Identity account or with one of the External Providers you enabled whilst completing the CMS guide.

Install a Markdown Editor
Choose a Markdown editor to customize your site. If you’re unsure, we recommend Typora.
Typora
Get Typora, a beautifully simple and user-friendly editor with support for visualizing technical content, such as math and diagrams.
Visual Studio Code
Get Visual Studio Code, a popular editor with an active online community for support.
JupyterLab
Get JupyterLab, a familiar editor for data analysts, data scientists, and researchers.
See our Jupyter guide to learn how to write content with Jupyter Notebooks.
RStudio
RMarkdown is a popular format with statisticians, often edited within RStudio.
See our RStudio guide to learn how to write content with RMarkdown in RStudio.
Deploy
Once you have made changes to your site, learn how to deploy to your preferred provider.
Remember to set your baseURL (website URL) in config/_default/config.yaml before deploying your site.
Support this free, open source website builder
We’re full steam ahead on improving Wowchemy, and we need your help!
- ❤️ Become a backer on Patreon or GitHub and unlock these rewards and extra features
- ⭐️ Star Wowchemy on GitHub
- Share your new site with the community
- 👩💻 Contribute code, PR reviews, documentation, color themes, tutorials, etc.
Edit your site
Follow the step by step guide to setup your new site.
For inspiration, refer to the Markdown content which powers the Academic Template.