Getting started? Wowchemy has a collection of beautiful templates for you to choose from.
Want to personalize the template? No problem, a Wowchemy template is fully customizable. In fact, you can change so many elements, it would be difficult to find the original template it was made from.
This page explains some common site customizations. You might also be interested in customizing the homepage.
Check out the Guides for details on each feature and for more advanced customization by extending Wowchemy.
Table of Contents
Personalise your URL
Give your site a professional appearance, such as your-name.com, whilst preventing it getting locked into one specific host such as GitHub Pages (your-name.github.io) or Netlify (your-name.netlify.app).
View the Custom Domain guide →
Website icon
Are you looking to customize the desktop and mobile icon (aka favicon) which appears in your site’s Progressive Web App (PWA) and web browser tab?
Save your icon as a square 512x512 pixel image named icon.png and place the image in your root assets/media/ folder, creating the folders if they don’t already exist.
Web browsers can cache icons, so you may not notice an immediate change unless the browser cache is cleared.
Appearance
The following options in config/_default/params.yaml can be set to personalise the appearance of your site:
appearance:
  theme_day: minimal
  theme_night: minimal
  font: minimal
  font_size: L
Light and Dark Modes
Setting both a day and night theme will automatically change the theme mode according to the user’s preference.
Otherwise, to force your visitors to see either a light or dark theme, set only a day or night theme, but not both.
A theme pack, such as Minimal, may contain both a light (day) and dark (night) theme. You can choose to use both light and dark styles from a single theme pack or styles from different theme packs, including your own styles (see below).
Color Themes
Wowchemy comes bundled with a variety of popular themes built-in including:
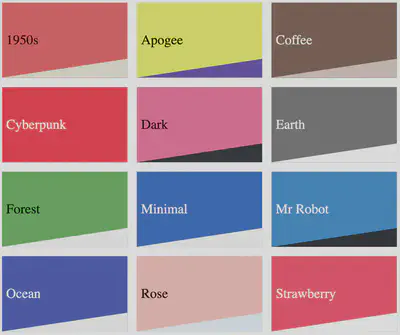
To choose a theme, set the theme_day and/or the theme_night option in config/_default/params.yaml.
Alternatively, you can create your own theme.
Fonts
You can choose from one of the following built-in font sets or create your own font set with Google Fonts or your own font files:
- Minimal (modern)
- Classic (original Academic v1 style)
- Rose (traditional serif)
- Mr Robot (futuristic)
- Cyberpunk (hacker style)
- Native: use device fonts for maximum performance
To choose a font set, set the font option in config/_default/params.yaml.
Font Sizes
The font size can be changed all the way from extra-small to extra large using the font_size option in config/_default/params.yaml. Supported font sizes are xs, s, m, l, xl.
Community Themes
In this section, we will curate themes submitted by users. To create your own theme and request it to be added to this section, follow these steps:
- Follow the guide to create a new theme
- Upload your theme file to a new Github repository
- Reach out to us with the repository link in the Contributing channel in the community Discord
Custom theme
Both the colour theme and font set can be customized.
To customize a color theme:
- Copy a color theme such as minimal.toml to
data/themes/my_theme.tomlat the root of your site, creating thedata/themes/folders if they do not already exist. Note: avoid using spaces in filenames. - Adjust the colors within your theme file using HTML color codes
- Edit
config/_default/params.yamlto settheme_day: my_themeif you created a light theme,theme_night: my_themeif you created a dark theme, or set both options if your theme pack contains both light and dark styles.
Custom font
To customize the font set:
- Copy a font set such as minimal.toml to
data/fonts/my_font_set.tomlat the root of your site, creating thedata/fonts/folders if they do not already exist. Note: avoid using spaces in filenames. - Adjust the font family, choosing from the library of Google Fonts if you wish - refer to the Google Font guide below
- Tell Wowchemy to use your new font set by setting
font: my_font_setinconfig/_default/params.yaml
To select a free web-font available from Google Fonts:
- Visit Google Fonts
- Click on each font you wish to use
- For each font, click + Select this style for each style you wish to use
- Click on the icon at the top right (View your selected families) to open the dialog box on the right
- Click on Embed
- Under <link>, copy the part of the URL starting from
family=to&display=swap...(not included) and paste it as thegoogle_fontsoption in your new font theme- For example, if Google gives you
<link href="https://fonts.googleapis.com/css2?family=B612+Mono&family=Open+Sans&display=swap" rel="stylesheet">, setgoogle_fonts = "family=B612+Mono&family=Open+Sans"
- For example, if Google gives you
- Under CSS rules to specify families in Google Font’s dialog, copy the font name and paste it as one of the fonts in your font theme
- For example, given
font-family: 'B612 Mono', monospace;, copyB612 Mono
- For example, given
Change font size
You can modify the font size all the way from extra-small to extra large using the font_size option in config/_default/params.yaml.
Choose from XS (extra small), S (small), M (medium), L (large - DEFAULT), and XL (extra large).
Share your theme
If you create your own theme, consider giving it a unique name and sharing your new theme or font set with the community or following the guide below so that it can be considered for curation.
Header
You can choose from the following options to customise the site header containing the navigation bar:
header:
  navbar:
    # Choose a navigation block
    block: navbar
    # Display the navigation bar?
    enable: true
    # Align menu links: left (l), center (c), or right (r)
    align: l
    # Display your site title or `assets/media/logo*` image in the nav bar?
    show_logo: true
    # Show a language chooser (if you have translated your site content)?
    show_translations: true
    # If `show_translations` is enabled, do you wish to display the current language name?
    show_language: false
    # Let the user override the default light/dark mode of your theme?
    show_day_night: true
    # Let the user search from the nav bar?
    show_search: true
    # Attempt to automatically highlight the active menu link? Can be disabled for complex sites.
    highlight_active_link: true
Want to swap out the navbar header block for a different layout?
You can do that too by choosing a block from the block repository or from your local layouts/partials/components/headers/ folder.
Menu items
The main menu links in the navigation bar can be edited in the config/_default/menu.yaml file.
For example, to link to the homepage and an about page, we paste their relative URLs from the root of the site:
main:
  - name: Home
    url: /
    weight: 10
  - name: About
    url: about/
    weight: 20
To order your links, set the weight options to any ascending numeric values. Here we use multiples of ten so that it’s easier to change the order in the future if we have many menu items.
Linking to page sections
To link to a section of the homepage, use the form #<section-filename> where <section-filename> is the filename (without .md extension). For example, #posts references a section with filename posts.md. You can rename your section files in content/home/, just remember to use a dash (-) instead of spaces in the filename.
Sub-Menus
To create a dropdown sub-menu, add identifier: a-unique-reference to the parent item and parent: a-unique-reference to the child item, replacing a-unique-reference with a unique reference of your choice.
Example of creating a Tags sub-menu:
main:
  - name: Home
    url: /
    weight: 10
  - name: Tags
    identifier: tags
    weight: 20
  - name: Academic
    parent: tags
    url: tags/academic/
    weight: 10
Learn more about the underlying Hugo menu system here.
Footer
Add your own message to the footer of a site using the notice text field in config/_default/params.yaml. The notice field supports two dynamic variables: {year} displays the current year and {license} will link to the copyright license if one is enabled.
Optionally, you can choose a Creative Commons copyright license too:
footer:
  block: minimal
  copyright:
    notice: '© {year} Me. This work is licensed under {license}'
    license:
      enable: true
      allow_derivatives: false
      share_alike: true
      allow_commercial: false
  # For multilingual sites, show a language chooser in the footer?
  show_translations: true
A copyright_license can also be displayed on a per-page basis by adding the option directly to a page’s front matter (see Page Features page).
For multilingual sites, you can display a language chooser in the footer using show_translations.
Want to swap out the minimal footer block for a different layout?
You can do that too by choosing a block from the block repository or from your local layouts/partials/components/footers/ folder.
Hide Published With Wowchemy
Want to hide or customize the Published with Wowchemy notice in the footer?
The notice can be automatically removed whilst ❤️ sponsoring ❤️ on the Creator tier or above.
Otherwise, please leave the attribution to this open source initiative that you benefit from intact. If the notice is not already translated for your language, refer to the Language guide to translate it.
Localization
The date, time, and address formats can be localized in config/_default/params.yaml. For example,
locale:
  date_format: 'Jan 2, 2006'
  time_format: '3:04 PM'
  address_format: en-us
Date/time options
Hugo uses the following constants to format dates and times:
| Type | Options |
|---|---|
| Year | 06 2006 |
| Month | 01 1 Jan January |
| Day | 02 2 _2 (width two, right justified) |
| Weekday | Mon Monday |
| Hours | 03 3 15 |
| Minutes | 04 4 |
| Seconds | 05 5 |
| AM/PM | PM pm |
| Timezone | MST |
| Offset | -0700 -07 -07:00 Z0700 Z07:00 |
To modify the format, edit date_format and time_format in config/_default/params.yaml using the above constants. For example, some common formats are:
| Format | Type |
|---|---|
January 2, 2006 | Date |
01/02/06 | |
Jan-02-06 | |
Mon, 02 Jan 2006 | |
Monday, 02 Jan 2006 | |
15:04 | Time |
3:04 PM | |
15:04 MST |
Address formats
If you display addresses on your site, such as for events or contact sections, you can choose an address format.
Don’t see the format you want? Contribute one or override the linked file to add your own.
Interface language
Personalise the interface text or choose a translation
Site Features
Refer to the Guides for the main features such as SEO, page sharing, and commenting.
Additional site features that can be customized in params.yaml are covered below.
SEO
Commenting
Analytics
Social sharing
View the Social Sharing guide →
Code syntax highlighting
Hugo’s code syntax highlighter is named Chroma. How can we customize Chroma’s light and dark styles?
Choose from one of the built-in styles including:
- github-light
- github-dark
- dracula
or import a Hugo Chroma style to your assets/css/libs/chroma/ folder (creating the folders as needed). For example, to import the xcode style as xcode-light and xcode-dark as xcode-dark:
mkdir -p assets/css/libs/chroma/
hugo gen chromastyles --style=xcode > assets/css/libs/chroma/xcode-light.css
hugo gen chromastyles --style=xcode-dark > assets/css/libs/chroma/xcode-dark.css
Once you have chosen your styles, reference them in params.yaml:
features:
  syntax_highlighter:
    theme_light: xcode-light
    theme_dark: xcode-dark
Latex math
features:
  math: true
Diagrams
Draw diagrams on pages using the Markdown-like Mermaid syntax.
Diagrams are automatically detected and rendered since v5.5.0.
Privacy
When the privacy pack is activated, a cookie consent message will be shown to visitors (linking to your Privacy Policy) and visitor IPs anonymized in Google Analytics (if enabled).
Enabling the privacy pack in params.yaml:
features:
  privacy_pack: true
To add a Privacy Policy, create a privacy.md file in your content folder and remove any draft option from the front matter to publish it.
Similarly, to add Legal Terms, create a terms.md file. Links to these documents will automatically appear in your site footer.
Link to edit page
Let your users suggest improvements to pages.
Simply update the URL and branch to match those of your GitHub repository. Then set editable: true to page front matter and a link will be added to the page footer to let users edit the page within the GitHub Editor.
features:
  repository:
    url: 'https://github.com/<username>/<repository>'
    content_dir: content
    branch: main
Get feedback
Add a feedback widget to your docs pages (Book layout) to get feedback on your content and prioritise which pages to improve.
The feedback widget is displayed when Google Analytics is setup on a live, production Hugo site. You can simulate a live site locally by changing Hugo’s environment to production: hugo server -e production. It can be disabled by setting feedback: false in the front matter.
Here’s how you can configure your feedback responses in params.yaml:
features:
  feedback:
    responses:
      positive: 'Glad to hear it! [Any ideas for improvements?](https://github.com/<USERNAME>/<REPO>/issues/new)'
      negative: 'Sorry to hear that. [Please tell us how we can improve](https://github.com/<USERNAME>/<REPO>/issues/new).'
Note: browsers which block Google Analytics may also block the feedback widget.
Recommendations
Recommend similar content to your readers at the end of pages.
In your page front matter:
show_related: true
Search
Security
Maps
Choose a map provider in order to display a map in the Contact widget.
The following map providers are supported: '' (no map), google, mapnik, or mapbox. Some map providers provide an api_key to set.
For example, to use Mapnik’s map service:
features:
  map:
    provider: 'mapnik'
    api_key: ''
    zoom: 15
After choosing a provider, set your map coordinates in your Contact widget in order to display a map:
content:
  coordinates:
    latitude: '37.4275'
    longitude: '-122.1697'
If you do not know your coordinates, you can retrieve them from Google Maps after searching for a location, or from alternative apps.